FrenzyME

My photo
I love crafts and Lovee DIY so much..I'm happily selling them at affordable price. So, this is the very place where I share my crafts project and also my other passions in life :) Enjoy!

FrenzyFellow

Showing posts with label DIY. Show all posts

Friday, April 18, 2014

~BABY CLOTHES BUNTING~

Baby Word Block
baby themed bunting/baby clothes wall decoration


Salam and hi, 

For mommies and auties out there who are looking for something to brighten up your baby room, here's a good suggestion. Baby clothes bunting!

We take orders for this baby themed bunting for only RM20 per meter.
We can cater it  to your liking the colours the design and such..

Guess what, it's not limited to baby theme only. We can do all sorts of theme according to your request. Just tell us and we will try to fullfil it :)

Email : applelicious@live.com
Phone : 019-2375232

Sunday, February 2, 2014

~CLEARANCE-PHOTO PROPS for sale~

Hi,
I'm doing a spring cleaning on my crafts materials. I have lotsss of EVA FOAM, therefore I'm introducing this photo props for sale. Selling it at cheap price, for the good handmade/material quality.
So hurry up and place you orders! :)

Price included shipping to all over Malaysia except for the bow. But if you buy together with either set below, you don't need to pay for the postage anymore..Great bargain! :)


All items made from EVA FOAM and some mixed with felt.


bow photo props
 Dots on bow.
RM3 each.
(postage RM7 Semenanjung, RM10 Sabah/Sarawak)

Only 8 pcs available
i love u photo props
 I  U set.

RM20 per set.
Postage included

Only 5 set available
mixed photo props set

Mixed photo props set. (8 pcs)

RM25
Postage included 

Only 10 set available


Have another design on mind? 
Email applelicious@live.com for inquiry 
or
sms/whatsapp 0192375232

I'm on facebook all the time these days.. So do like my page on craftsfrenzy for more frequent updates :)
Have a pleasant day!

Thursday, March 24, 2011

~ORIGAMI frenzy!!~

OMG!!Totally crazy with these origamis.
Creative and cantik sangat..Mostly made from Washi paper..
Bring back good memories of my Japanase language classes..

Kimono Origami bookmark

 I think these would be a great doorgift/souvenir for guest and friends kan ?
Great idea for DIY..Invitation card perhaps?
butterfly origami
 And this one suitable as deco on guestbook/hantaran or even dais!

angel origami

Oooh..definitely need to shop for washi papers now.Mane nak cari??I think DAISO ade..
Gonna be my next craft project when I got time.Can't wait. :)

Tuesday, March 1, 2011

~Tutorial-Making A Simple DIP Flowers~

Here's a tutorial on how to make dip flowers using Q-dip material (This is what it is called in Malaysia, I think formafilm is something similar)
I believe that this art is originated from Japan ( pardon me if I'm wrong :P )
A thin layer of glossy plastic like material is formed by dipping wire outlines (petals)  into coloured chemical and leave it to dry.
This materials (buy here) are easily torn when it's dry and usually strengthener is applied using brush to toughen it.
Sorry no picture of strengthener. 
The Q-dip. I prefer Star brand but this brand is OK. Don't forget wires and polystrene.
My favourite Q-dip

And this q-dip when exposed to air, tends to harden therefore thinner is used to dilute it. In crafts shop (In Malaysia of course :P) There's a special bottled thinner that they claimed specially made for this Q-dip material. 


But I, believed that you simply can use normal thinner you can find at hardware stores..! :P
Tried it and it work as well.


You make the outline of the flowers you want, similar to stocking flowers making.
In here I used lipstick :)

I made 3 loops around the lipstick then tie it together in a knot

Then, pry it open.

You can shape the petals according to your liking. Pinch it slowly until you get the desired result.

Carefully lower the outlines into the dip. Ensure that the end is fully covered, it's like handling soap bubbles so that the  thin surface won't break.
After that,  leave it to dry. This stuffs starts to harden fast, but only touch it after 1 hour or so. you don't want to ruin it.

Tape the  leftover wire neatly

Add pearls/beads to the centre using glue.

Here you go :)
*Tips- Your fingerprints may be visible when you touch the dips flowers and reduce the glossiness..Wipe it away with soft cloth..

After sometime, the unused dip starts to thicken when exposed to air...Add a bit of thinner (Starts with 3 table spoons and increased more if needed). Stir the mixture evenly before used.

Bubbles tend to form when you open the dip for too long and when there's fan (moving air) nearby. Eliminate this by covering the lid and leave it to dissolve for sometime..

Below are examples of the Dip bunga telur I made :


Hope this tutorial is useful. Feel free to ask me if you need clarifications :)

Tuesday, February 22, 2011

~Handmade Wedding gift~

Last Saturday, I went to my ex-schoolmates wedding.. Buat dekat Dewan Sri Melati, Putrajaya. Betul2 depan Istana Kehakiman. The bride was in the same batch as me while the groom is a year senior. The wedding then turned into a mini reunion for us Jiwarians :) Met a teacher there too :) The ever lovely Cikgu Jimah :) Since I didn't have time (and transport) to buy a gift for the couple, I decided to give them my handmade gift. A pot of flowers!

Jiwarians 2003 with the couple

My wedding gift to them

Nylon stocking flowers arrangement
It took me about 4 hours to complete it. The white pot is from IKEA and the nylon stockings are whatever left lying around in my stock.
I hope their love will bloom always, like the flowers! :)

Friday, February 18, 2011

~Tutorial-Making A Simple Nylon Stocking Flower, Part 2~

~Continuation from previous post PART 1~
Now that we have 5 petals ready, it is time to assemble it.

Divide the white stamens into 2 by using a floral wire. The amount of stamens used are according to your liking (and budget of course! :P)


Hold the stamens and proceed by adding a petal to it. Tie the petal and the stamens together with thread.


 Continue adding all petals, one at a time. Arrange it nicely.


Then , tidy up the joining point with the floral tape.


There you go, a simple nylon stocking flower which can be turn into bunga telur or bunga dulang :)


*Tips : You still can shape up the petals by pinching the wires eventhough it's already done.. However, be extra careful as the stocking are easy to be torn. You don't want to redo the whole process again rite.


Below are example of a single tone flower. I pinched the outer frame slightly and used crepe paper to substitute the stamens :)

Nylon stocking flower
Do try this ya :)

Thursday, February 17, 2011

~Tutorial-Making A Simple Nylon Stocking Flower, Part 1~

Hey ya! :) Let's us try to make nylon stocking flower together.This tutorial is a very basic one. No intricate design whatsover :) 

Simple Nylon stocking flower
You will need nylon stocking (exclusive for flower making,not to wear!) Either single or dual tone. The single tone is cheaper, around RM1.50 per piece. The price for the dual tone is higher, RM2.++ (sorry can't remember the exact price :( )
I used purple stockings, white stamens, green floral tape and silver wires in this tutorial. The colour can be changed accordingly to your liking.
*Tips : Buy brightly coloured stocking or darker colour. As it will be stretched, the stocking colour will be softer/pale. Unless you don't mind. Haha
The materials
*Ensure that the wires are not too soft as it cannot retain the shape of the flowers. Most crafts shop sells two type. The softer one is for making dip flowers while the harder one is for stocking flowers. Make sure you buy the correct one! The wires come in gold and silver along with few other colours.

1) First of all, cut the silver wires into 4. Then, make a loop by twisting the end together by using a plier.


*You will need to twist 5 wires to make 5 petals flower

2) Next, carefully wrap the loop with stocking, starting at one end.


The back and front of the petal must be fully covered and stretched before tying it with thread. Do not overstretch it as the stocking can be torn easily.


Repeat the step until all 5 petals are nicely wrapped. Snip off the excess stockings with a pair of sharp scissor.
*Tips : Hold the petal as the picture below. Using your left thumb and ring finger, stretch the excess stocking while cutting it. This way, you'll get a clean cut, and save the stocking a lot. 


 There you go, 5 petals ready to be assembled. Bravo! :)


*If you wish to make flowers with more petals, like roses, you need to make around 14 petals or more.

That's all for now. To be continue in part 2. Stay tuned :)

Thursday, January 27, 2011

~Hand Bouquet Guide~


Bride to be usually have a  huge dillema when choosing the hand bouquet.. But how do you choose one to suit you best?Those yang amik package dgn pelamin oklah..Tapi if yang nak buat sendiri or tempah mesti pening..Ikut hati memangla nak semua..Rambang mata!! :P
Fresh flowers look beautiful without needing much effort in arranging but it can be a bit expensive and doesn’t last. And if tak pandai gubah, boleh jadi disaster! :P While artificial flowers can be breathtaking if you choose wisely, but most of the time they look just plain. The good thing is they last...
Either you opt for fresh flowers or artificial..It doesn’t matter..Both can look amazing provided you choose the right design, and the right colour. Let's ponder upon the type of arrangement..Zaaas~
Posy bouquet

Suitable for bride with any body shape and height..Recommended for petite bride. Any flowers will do. Roses, lilies, peonies are best. You can mix few types of flowers or just go for one type. Additional accessories such as butterfly, dragonfly, feathers and pearls can also be added to make your bouquet unique. Artificial flowers seswai buat style ni..
Sheath bouquet (arm bouquet)
Simple and elegant. Suitable for everyone. Exceptionally beautiful with tulip, calla lily and lavender (Long slender stem flowers).Orchid pun cantik tau buat this style. Use pretty ribbons to complement the bouquet. I love this style....simple but sweet... :) 


Shower bouquet (cascade/trailing bouquet)
Traditional teardrop shape, consisting of a posy with a trail of flowers and foliage (Dedaun byk2) Best suits tall bride. However petite bride can choose this design with shorter trails..Atas paras lutut..Yang tinggi melayup bolehla wat sampai betis/lantai..You don’t want to be stepping on your own wedding flowers aren’t you? :) Any flowers will do. Personally I think tropical flowers will look best.

Creative bouquet
Creative bouquet can be anything! Any shape and using any additional accessories. They can be crescent shape, heart shape or even wreaths. Suitable for daring bride who wants to be one of a kind :)


Hmmm...Definitely rambang mata kan...


Saturday, January 22, 2011

~Brown Paper Bag~

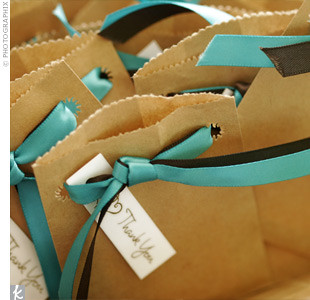
These days, the trend is to give paper bags (with all sort of things inside, from cupcakes, chocolates to towel) for wedding favours. Some even expect to be given one. If tak bagi, you'll hear toungue wagging behind..Dah macam compulsory pulak kan??..Budget limited..pening2..So how? Ok, we're trying to save money as much as we can and be environmentally friendly at the same time!
The solution is, BROWN PAPER BAG


Simple but nice..And easy on the wallet (Compared to paperbag yang tebal/colourful)
Ikat ribbons saja pun dah cantik :) If you have extra budget boleh customize by putting Thank You tag/label macam pics bawah ni.. (DIY of course!)


Lovely! :)

#Pictures thanks to Mr.Google :) Will try to DIY one later..and share it with all of you :) Promise

Thursday, January 20, 2011

DIY Flower girls Hairclip


Flower girls can make a wedding looks more cheerful and pretty. However, their dress and accessories can add up to your wedding budget. Save up money by doing yourself!  This is a simple way on how to decorate flower girl's hairclip :) Cuba jangan tak cuba!

You need to have-->scissor, SWG 26 wires, artificial flowers (preferably with beads but any flowers will do actually.Use big flowers such as roses for more impact :P), gold strings, green floral tape, basic hairclip, needle, pearl beads, and glue. 


First step is to wrap the wire with the floral tape about 5 cm. This is the length of wire that you gonna tie to the clip.


Then,start taping  the flowers to the wire.One by one.. You can use more than one type of flowers. Just arrange it nicely on the clip. Boleh selang-selikan dengan bunga lain tau :)


When all four flowers are arranged, tidy up the excess wire around another 5cm.


After that, take the gold strings and glue pearl beads on it. Tie the strings to the flowers. You have to make 3 sets of pearl strings. (or more..up to you :)  ) The length of the strings may vary according to your taste. If tak nak ikat tali macam contoh boleh gantikan dengan ribbons :)


Finally, tie the wire arranged with flowers to the hairclip. The wire is soft enough to be twisted by hand. Do it neatly as to prevent the sharp end of the wire from harming the person who is going to wear the clip.


There you go..A pretty hairclip for a pretty flower girl :)